Wednesday, November 27, 2013

sweet and simple


When the Santa Clause Parade comes to town, it's a sign to begin gearing up for Christmas.  Storing away the autumn decor to set up the tree, stringing up the lights outside the window, starting on the holiday baking...all the magic of the holidays.

After attending the big city parade last year, we decided to tone it down this year, and meet up with friends and go to the local one in town.  Although the weather was much colder than previous years (it was around -15 degrees!), and the parade wasn't as professionally coordinated as the one we saw last year, I really enjoyed the simple pace this time around.


As much as I would love to go to the legendary Macy's parade in New York, there is something quite sweet about watching small floats proudly displayed by local schools or associations...the ones that don't have the most lights and fancy costumes, but has all the twinkle of effort and anticipation for this beautiful season.

Hand written signs, parent-sewn costumes, and horse drawn carriages show a sense of pride, and it's easy to forget how meaningful it is to contribute to the local community.  These floats showed heart and community spirit...not a national brand campaign from a large corporation.


I think this year's local parade was a nice transition for our family, into the busyness of the upcoming holiday season.  We didn't have to fight for a spot to sit down, everyone was courteous and polite, and afterwards we enjoyed our friends company for hot cocoa and simple but warm comfort food in our home.

I'm not sure how many more years we'll have, until the novelty of attending the Santa parade starts to wear off, especially for our oldest child.  Maybe we'll have to go see bigger, flashier productions in the future but for now, I hope this year's parade has set a precedent for the kind of Christmas season we'll have ahead of us...


...sweet and simple.


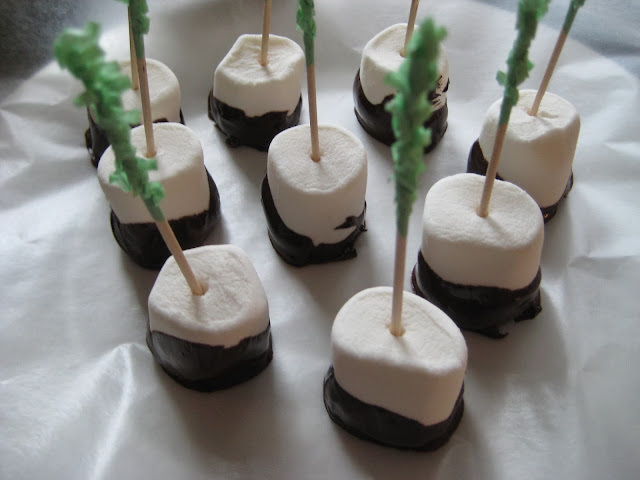
Easy Marshmallow Pops
(makes about 30 pops)
I didn't have candy canes (I like to crush them to put on the bottom), so I used whatever I had on hand (I had toffee bits).  This recipe is very adaptable...you can use practically any kind of chocolate.  This is a quick recipe to do and simple enough for the kids to help with this.

Ingredients:
  • Large Marshmallows (about 30)
  • ½ cup Peppermint Chocolate Chips (I used the President's Choice ones)
  • ½ a bar of dark organic chocolate bar (approx. 50g), chopped
  • Toffee bits (I used Chipit's Skor toffee bits, found in the chocolate chip aisle...you can use sprinkles, coconut or any other crushed candy or cookie you desire).
  • Toothpicks (I liked using the frilled ones in various colours, so you can distinguish the different flavours...small candy canes work too).
Directions
  • In a small glass bowl, microwave the chocolate chips on medium for 2 minutes.  Stir vigorously until smooth (heat again on medium for another 30 second increments, if needed, stirring inbetween).
  • In another small glass bowl, microwave the chopped chocolate bar on medium for 2 minutes.  Stir vigorously until smooth (heat again on medium for another 30 second increments, if needed, stirring inbetween).
  • Let the chocolate cool a minute.  Stir the chocolate to ensure it's still smooth.
  • Place wax paper on large plates.
  • Place toffee bits onto a plate.
  • Insert toothpick in marshmallow then dip and swirl into the chocolate.  Then dip into the toffee bits.
  • Place on the wax paper.  
  • Cool at room temperature for 4-6 hours or place in the fridge for at least 15 minutes.

Best served with hot chocolate.


Wednesday, November 20, 2013

sticking out


Growing up in a small suburb, I was one of those children who didn't quite fit into the norm of what your average Canadian girl looked like.

With immigrant parents, it was equally as difficult to balance the two worlds that I lived in....the world that held onto the roots and heritage of previous generations, and a world that I was born into--a world that at times, didn't quite respect or understand those roots.

As a child, on the odd occasion during Hallowe'en, my friends and I would receive "white rabbit" candy (it's a taffy-like candy originated from Asia) from a neighbour, and when we would go through our loot, there would be strange remarks about this exotic treat, often ridiculed that it was "weird"  and they wanted to give them away.  And of course to look "cool", I'd play along pretending not to know too much about that candy, so I gathered theirs so I can "get rid of them later".  But deep down, I thought to myself, if those kids only knew how amazingly sweet and yummy those candies were...I guess I benefitted from what they didn't know.


We often take our past experiences, especially childhood ones, and apply them to our own children.  If we were bullied as a child because of our "differences", now as parents, we try to make sure our children assimilate a little more, so they don't suffer the same negative experience.  Or if we didn't fit in because we didn't play the sport that every other kid in the class did, as parents we try to force our kids to do those very same sports, so they don't feel left out like we did.

As tempting as it is to try to make our children's lives "easier", I don't know if this is the right approach.  I think growing up "different" has made me learn to try to accomplish even more.  To fight harder and be even more distinguishable.  In fact, because I was different, I wonder if I was heard more often and took on more leadership qualities because I wasn't drowned out in the mediocrity of being part of a pack.


This year, when I was going through Hallowe'en candy, I found a few traditional Chinese candies in red packages, sticking out amongst the chocolate bars and caramels and I wondered what my kids would do with them.

They didn't even flinch and put them in their pile to keep.  I guess they're much further ahead than I was when I was their age, as they've learned to embrace all things...both the common and different.  And they know that different can be sweet.


Caramel Apples with Chocolate Drizzle

We've often received caramel squares at Hallowe'en, but this year, we didn't get as many, so I wasn't able to use up left over candy for this recipe.  If you do have caramels, you can replace the first four ingredients with about 30 caramels squares.

Ingredients
  • 2 C brown sugar
  • 1 C corn syrup
  • 1/2 C butter
  • Vanilla
  • Approximately 6 large apples. (any kind would do)
  • 1 can sweetened condensed milk
  • 1 piece of Baker's Chocolate, melted
  • Popsicle sticks
Directions
  • Combine the sugar, corn syrup and butter in a small pot and heat on medium on the stove until the butter is melted.
  • Stir constantly, then add 1 tsp. vanilla
  • Remove from heat and continue stirring until a thin consistency.
  • Stick a popsicle stick into the top of the apples.
  • Dip apples into the caramel.
  • Set apples on a cookie sheet or silpat.
  • Place in refrigerator for about 15 minutes.
  • As the caramel hardens in the fridge, melt the baker's chocolate in the microwave for 2 minutes on low until soft.  Stir until melted.
  • Using a spoon, drizzle the chocolate onto the apples.  
  • Refrigerate for at least 15 minutes or until chocolate hardens.

Enjoy!


Wednesday, November 13, 2013

winter is stewing


A few days ago, there were snow squall warnings in our area, and weather reports warned us of snow heading our way with messy driving conditions.

When I hear the word "snow", I begin my preparations for the long winter ahead.

It's a sign to get the winter boots out.  It's a sign to make sure all the winter coats, hats and gloves are ready to go....and to make sure the snow gear for the car is primed and ready for good use.


I began working on our Christmas cards and stumbled upon some photos of the snow from last winter.  The snow looked so beautiful, and for a brief moment (very brief!), I looked forward to seeing white covered rooftops, admiring the twinkling of the light reflected on the snow as we drink hot cocoa and eat comfort food.  I love how the cold temperatures gives us many opportunities to cuddle and spend time with each other.

Although the snow still hasn't arrived yet, you can feel it's just around the corner.  While we can feel the winter season stewing in the air, we will be ready for it...with our own kind of stew.


Slow Cooker Beef Stew

Ingredients:
  • 1 lb. beef stew meat
  • 1 lb. potatoes, cut in 1" chunks
  • 4 organic carrots, cut in 1" chunks
  • 1 onion, chopped
  • 2 garlic cloves, diced
  • 1 can of chopped tomatoes, undrained (I use the "unsalted" versions)
  • 2 stalks of celery, cut into 1" chunks (I didn't have it on hand this time...it is fine without it, but much more flavourful with it)
  • Spices:  thyme, oregano, black pepper, salt (to taste)
Stir all the ingredients together in the crockpot and cook for 12 hours on low (or 6 hours on high).

Enjoy.


Wednesday, November 06, 2013

each peach pear


Our basement renovation this past summer forced us to make decisions on what we really should keep and what we should donate or purge.  I don't know how other people feel when purging, but when I go over some of the old toys or children's books that my kids have outgrown, sometimes I have "issues" with letting some of those items go.

I know...those are just things, right?  That we should't have sentimental ties with objects and just learn to keep the memory in our hearts.


But as I run my fingers along the worn edges of some of those old board books, the favourites that my kids read over and over again, like "Each Peach Pear Plum" or any of the Sandra Boynton books, I can almost quote them verbatim without opening the cover, and when I do, I'm transported once again to those early years when the kids would touch and feel the books, absorbing all that is new.

It all started here.


Now, the stories that capture their imagination are books well beyond what I'd ever had read at their age, and I love how they embrace the genres that was never quite part of my repertoire...science fiction, fantasy or adventure, and voraciously consume each word of their prized novels like delicious desserts for the mind.  Food for their soul.

So for now, I might keep a few well selected books, just for me. Just as a reminder of how far they've come on their own journey and how much they've evolved from "Each Peach Pear Plum". They've added their own flavour to their reading tastes, and I will just continue feeding them with new adventures that await them on the bookshelves. Maybe one day I will learn to let go of those old books and take the lead from my kids and just be inspired to open new chapters with exciting adventures...and discover my own new flavours.


Peach Pear Blueberry Cobbler


I had a lot of fruit left over that needed to be consumed. I was originally going to make a peach galette, but didn't have quite enough peaches.  This recipe was blindly adapted to include whatever fruit that I had on hand.  It turned out great.

Ingredients

For the filling:
  • 1/4 cup brown sugar
  • 1/4 cup white sugar
  • 1/2 cup all-purpose flour
  • 1 teaspoon ground cinnamon
  • 1/4 tsp. allspice
  • 1/4 teaspoon salt
  • 4 peaches, peeled and sliced.
  • 1 pear, peeled and sliced (I used Asian pear, which is on the watery side.  Bosc pears would work well too).
  • 1 pint of blueberries.
  • 1 teaspoon cornstarch, dissolved in 1 tablespoon water
  • 1 lemon, juiced (4 tsp.)
  • 1 tsp. almond extract (optional)
  • Butter to grease dish
For the crumb topping:
  • 1/3 cup brown sugar
  • 2 tbsp. cup sugar
  • 1/3 cup all-purpose flour
  • 1/3 cup quick oats
  • 12 tbsp. cup slivered almonds
  • 1/4 teaspoon freshly grated nutmeg (optional)
  • 1/2 teaspoon ground cinnamon
  • 1/4 cup unsalted butter, room temperature, cut into 8 pieces

Directions

Preheat oven to 450 degrees F.

To make the peach filling:
  • In a large bowl, stir together sugars, flour, cinnamon, nutmeg, and salt.  
  • Add peaches and gently toss to coat. 
  • Mix the cornstarch with water until a slight paste, add almond extract and lemon juice. 
  • Stir into peaches to incorporate. 
  • Butter a 9 x 9 baking dish and add peach mixture.
To make the crumb topping:
  • In a medium bowl, combine all dry ingredients but the butter.
  • Add in butter pieces and combine with hands until crumbly.
Assemble:
  • Top peaches with half of the crumb topping. 
  • Place in oven and immediately reduce oven temperature to 350 degrees F. 
  • Bake uncovered for 30 minutes, then add remainder of the crumb topping. 
  • Reduce heat to 325 degrees F and bake until golden and bubbling, another 45 minutes. 
  • Remove from oven and let sit for 15 minutes before serving.
Serve with vanilla ice cream or fresh whipped cream.

Enjoy.